
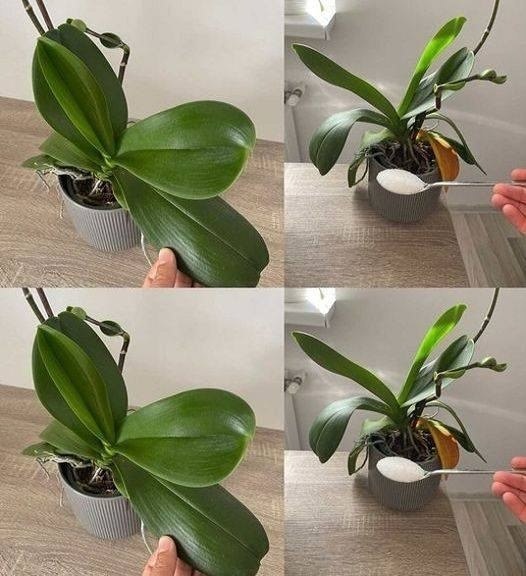
First, make sure you have a high-quality liquid orchid fertilizer. Measure **1 tablespoon** of the fertilizer and add it to **1 gallon** (4 liters) of water. Make sure to mix it thoroughly so that the fertilizer is evenly distributed throughout the water.
#### **Step 2: Watering the Orchid**
Once your fertilizer solution is ready, you can water your orchid. Make sure the orchid is in its pot, and it is best to water in the morning or early afternoon, allowing the plant to dry out by evening. Water the orchid with the fertilized solution until it drains from the bottom of the pot. This ensures that the nutrients are reaching the roots and being absorbed evenly.
#### **Step 3: Drain Excess Water**
After watering, it’s important to allow the orchid to drain properly. Orchids, especially in containers, should never sit in standing water, as this can lead to root rot. Place the pot in a well-drained area, and let it drain fully before returning it to its spot.
#### **Step 4: Repeat Weekly**
For continuous blooming, apply the fertilizer solution once a week during the growing season (typically spring and summer). In the fall and winter months, when orchids are in their dormant period, you can reduce the frequency of fertilization to once every two weeks or even once a month, depending on the variety of orchid you are caring for.
### **Types of Fertilizers for Orchids: Liquid vs. Slow-Release**
There are two main types of fertilizers that are commonly used for orchids: **liquid fertilizers** and **slow-release fertilizers**. Both can be effective, but they have different benefits and drawbacks. Understanding these options will help you choose the right fertilizer for your orchids.
#### **1. Liquid Fertilizers**
Liquid fertilizers, like the one we’re discussing in this article, are the most popular and efficient choice for orchids. They are easy to mix and apply, providing immediate nutrients to the plant. Liquid fertilizers can be absorbed quickly by the orchid’s roots, promoting healthy growth and frequent blooming.
Advantages:
– Quick absorption by the plant.
– Allows for easy control of nutrient levels.
– Customizable application (you can dilute the solution to the strength you desire).
Disadvantages:
– Must be applied regularly, typically every week during the growing season.
– Can be more expensive than other options.
#### **2. Slow-Release Fertilizers**
Slow-release fertilizers are another option for orchid care. These fertilizers are typically granular and release nutrients gradually over time. They are convenient for people who don’t want to worry about fertilizing frequently.
Advantages:
– Convenient—only needs to be applied once every few months.
– Consistent nutrient release over time.
Disadvantages:
– Slow nutrient uptake, which means the orchid might not respond as quickly to changes in feeding.
– Can be difficult to control the nutrient strength.
### **Other Orchid Care Tips for Maximum Blooming**
Fertilization is just one part of the equation when it comes to keeping your orchids blooming non-stop. There are several other factors to consider that can help your orchids thrive.
#### **1. Light**
Orchids thrive in bright, indirect light. Too little light can prevent the plant from blooming, while too much direct sunlight can scorch the leaves. Make sure your orchid is placed in a spot where it receives plenty of filtered light.
#### **2. Temperature and Humidity**
Orchids generally prefer warm temperatures and high humidity. Keep your orchid in a room where the temperature stays between **60-80°F (15-27°C)**. You can increase humidity by placing a humidifier near your orchid or placing a tray of water and pebbles near the plant.
#### **3. Watering**
Orchids should not be overwatered. Water them once a week or when the top inch of the soil feels dry to the touch. Use room-temperature water and avoid allowing the plant to sit in standing water, as this can lead to root rot.
#### **4. Repotting**
Orchids need to be repotted every 1-2 years to ensure their roots have enough space to grow. When repotting, use an orchid-specific potting mix that drains well and allows air to circulate around the roots.
### **Conclusion: A Simple Trick for Non-Stop Orchids**
With just **1 tablespoon** of high-quality fertilizer and a little bit of attention, your orchids can bloom consistently, adding beauty and vibrancy to your home year-round. By providing the right nutrients, maintaining the proper care routines, and giving your orchids the right environment, you’ll be amazed at how easy it is to keep them blooming non-stop.
Orchids can sometimes seem like high-maintenance plants, but with the right fertilizer and a bit of care, they can reward you with stunning flowers again and again. Whether you’re a seasoned orchid enthusiast or a beginner, this simple yet powerful trick will help you cultivate beautiful, healthy orchids that will bloom for months to come.
So, go ahead—give your orchids the boost they need with just **1 tablespoon** of fertilizer, and watch them thrive and bloom like never before!
ADVERTISEMENT
